Blending
Lecture description
In this lecture students will learn how to use digital brushes to blend 2 colors or values together. We'll use the brush tool and eye dropper tool to get a smooth transition between t2 colors and then 3 colors.
Learn more from the full course
The Ultimate Digital Painting Course - Beginner to Advanced
Everything from drawing fundamentals to professional painting techniques
27:07:40 of on-demand video • Updated March 2022
Digital painting techniques
Drawing Fundamentals
How to create concept art
Color theory
Character design
Photo realistic painting
Perspective
English [Auto]
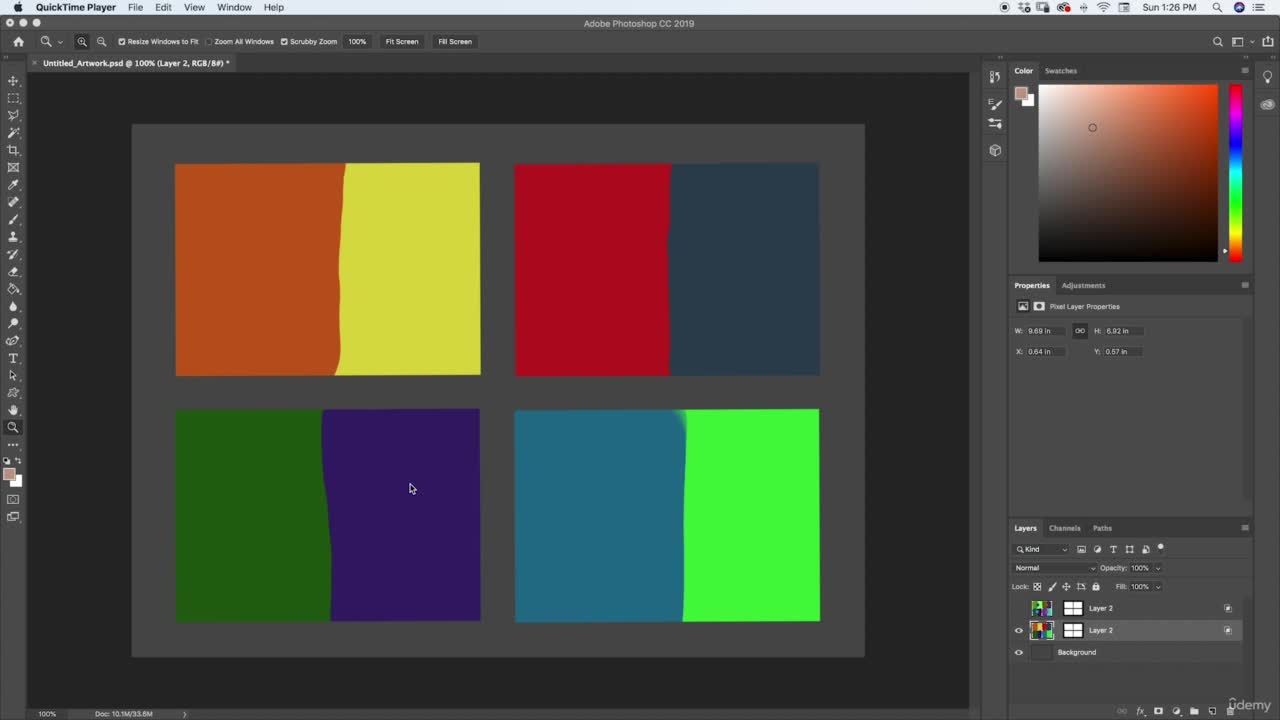
All right. So in this lecture, we're going to be talking about blending. Blending is one of the most fundamental, basic techniques you'll need to use in order to create good paintings. And a lot of times people's blending when they first start looks really streaky, has hard edges where they want smooth edges, and it doesn't really feel like a blend as much as a gradient, which there is a difference. So we are going to go over how you can use certain techniques to blend to colors or to values together. So we have these boxes here, we're going to do two versions. So we have the basic one. You're going to start off with these. You're going to blend each of these into a smooth transition between these two colors. And then after that, we're going to go to the more advanced one, and you're going to blend these three colors together into something more complex. But we're going to throw the easy 1/1. So what we do, we start out, we're going to get our Eyedropper Tool, we are going to go ahead and color pick one of the colors. I'm going to do it. Let's do these two right here. And then you can do all of them by making these two for an example. So get my color picker color picker tool, get my brush and I'm going to use a hard round pressure pass up. Let's do this one. Yeah. I'll work and then I'll bring the harness down a little bit. Okay. And what are you going to do is kind of just start to blend it over across the line there and you'll see that as you do. One, we still kind of have that streak, but two, that's not quite as smooth as we want. So what we're going to do is we're going to come back to our color picker. And in this transition space in between, you're going to see there's a slightly different color where the colors are starting to overlap. We're going to color pick that color, go back to our brush and start brushing it back the other way now. Okay. And you keep doing that. Your color pic back and forth, switching between your eyedropper and your brush. And continue to blend that transition. And you're just going to keep doing this until you can get a nice, smooth blend between your two colors. You don't want to look streaky or have any things like that working against you. Okay. And then we're just going to blend it until you cannot see the transition you want. It's just a nice, smooth, seamless transition from one color to the other. All right. There you go. Like that. Let's do this one. Try another one. I'm going to do. This green to blue. So I'm just gonna color pick that in between value. And then continue to move it back and forth as we transition between those two colors. You can also do this between black and white values, which I also recommend because it can help make it feel a little bit more organic and painterly than just going up to your color picker. Because an easy color picker, you can just pick the exact color of gray you want or need, but it can also feel kind of stale. And when you do it this way. It can feel a lot more blended and natural. Something you should also try while you're doing this is to have tighter and looser transitions. So like try somewhere. The blend is really gradual and then try somewhere. The blend is really sharp where it kind of more quickly transitions from one color to the next, because sometimes you want it to be really smooth and and slow, but other times you might need it to kind of change a bit quicker. All right. I think that one looks pretty good. I was blend up this corner up here a bit. There you go. Those two examples. So you could do the same thing on both. All four of these are going to blend each of these into each other. Then what we're going to do, you're going to do the more complicated one. So let's do this one right here. I think you're going to blend all of these together, but you need to make sure that you still have purple, you still have this teal color and you still have the red. You can't just completely blend the red away. You need to blend the edges while still keeping those core colors in the middle intact. So let's let's try this one. Let's give it a shot. Oh, let's make sure that's why it's not working. We're on the wrong layer there. All right. So every purple color, we're going to start blending that in here. And then now we can start color picking. I'm starting with the ball. I guess it's not necessarily a ball, but a circle at least. Blending that through. Making sure we're color picking plenty of times. You shouldn't just be color picking your base color, the transition color, and then whatever's in between. There's lots of other smaller transitions in between there. The more that you color pick from those, the smoother and more vibrant your blend is going to be than if you just do those two or three right off the bat. All right. Let's start to blend our teal color up here. And you know, let's also do this real quick. Get that teal blend to read as well going. Personally, I think that this helps keep colors more vibrant, especially when you're blending two colors that would normally kind of start to get a little muddy. Like, for example, this teal and this red, it kind of helps it feel a little bit more lively, I guess. Like it doesn't just turn into a big pile of muck if you can get practiced at it anyways. It takes some time, but. It can have a lot more appealing blends between your colors and you might be able to get just a straight gradient, for example. So in these parts where we have three way transition, you really want to make sure that you can smooth this all out into a nice even transition there. All right. And then let's just get this down here. We get a little bit of a smoother blend there as we transition from the ball to the sort of three way blend there. All right. And then let's go finish up this red purple transition here. I think we can make that a little smoother. And then same right here. You can also still see a little bit of a line there. Just get rid of that. All right. There you go. So that's your assignment. It's going to take some practice, but it's pretty straightforward. It's not anything too crazy. It might feel a little bit frustrating, but just take your time. The more that you do this, the more you'll kind of get a feel for it and you'll be able to start blending a lot more easily and a lot more smoothly. But take your time. This is a really important skill to master when it comes to digital painting, because a lot of your blending and stuff is like your gradients and all that stuff is going to come from just practicing this sort of hand-eye coordination sort of thing where you're practicing holding down and letting off of your pressure, you know. So just keep working at it. It takes some time, but do all four of these ones and then all four of these as well, go ahead and post them in the Facebook group, post them in the Q&A. It'll be really great to get feedback on these because me or other students who are been able to do this successfully will be able to tell, you know, maybe what you can work on or notice things that when you've been staring at it for a long time, you might be able to recognize. And then the other benefit, you can go back and do it again until you can kind of figure it out. And like I said, it's probably a little monotonous, but trust me, this one, if you can master this, if you can learn how to nail this, it's really going to help take your paintings to the next level. So that is it for this lecture. And I will see you guys in the next one.